> For the complete documentation index, see [llms.txt](https://faq.thepackgaming.com/llms.txt). Markdown versions of documentation pages are available by appending `.md` to page URLs; this page is available as [Markdown](https://faq.thepackgaming.com/alphys-help-desk/directory/ase.md).
# ASE: Graphic and PC Enhancements
Post of helpful Optimizations and Client side bug fixes for our ARK Players:
## Why is ASE(ARK) so poorly optimized?
Many users struggle with Ark’s performance stutters, low FPS (frames per second), and graphical glitches. Ark is a highly unoptimized game, as even high-end hardware often isn’t able to achieve a smooth 60 FPS or even a stable 30 FPS. So what gives? Ark’s poor performance stems from problems in its code, as it’s not optimized enough to run smoother. Unfortunately, there’s nothing you can do about it other than fine-tune the settings, which is what we’re here for!
### POST - Aquatica Launch OPTION:
The PACK has a mod package that you should subscribe to before joining one of our ASA servers, this is found HERE:
{% embed url="" %}
## ARK: Aquatica and A.S.E. announcement
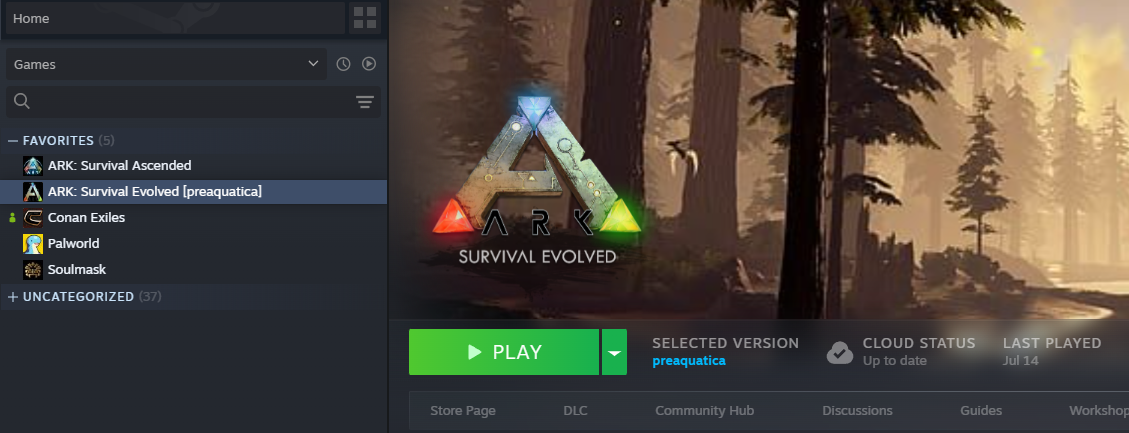
We have enabled a public branch of the game that was the previous build before the update at launch (7/15). Players will be able to opt into that branch and continue to play A.S.E. pre-Aquatica release
The branch is called "preaquatica". To navigate to the branch:
* Right Click ARK: Survival Evolved in your Steam Library
* Click Properties
* Click Betas then Beta participation.
* Click on "preaquatica" branch
* If you are unable to see this branch, please exit Steam. And restart the app.
* You can access Aquatica by reverting the opt in process. But to play any map with mods, you will have to Opt in to the Pre-aquatica beta.
### ASE(ARK) Launch Options
You can squeeze more performance or fidelity out of Ark by using some command options. Add them to the game using the various game launchers and platforms:
*On Steam, go to your library, right-click on ARK: SA and, select Properties and click on Set Launch Options.*


***Here’s a list of the best ones you can and should use:***\
-high -lowmemory -sm4 -d3d10 -nomansky -window (-w 1860 -h 980 set this to your preferred window size)
*On Epic, click the little Settings cog under ARK:SA to open the settings. Scroll all the way down until you see Advanced Command Line Arguments.*
#### Many Console Commands can function as a launch option by adding a "-" in front of the console command, but some cannot be used in this fashion. The most common launch options are listed below.
***Here’s a list of the most popular launch options:***
***-Sm4:*** Forces a simpler shade model that lowers the graphical fidelity. In our tests, this improved the frame rate by about 25%, but it also made the game look significantly worse. This command also weakens the lighting effect of torches and other elements in the game. Use this only if you have no choice, and use it along with the d3d10 switch below.
**-d3d10**: Forces the game to use DirectX 10 instead of 11 to boost performance at the cost of graphics.
**-high**: Forces high CPU priority, which might give you extra FPS. However, as discussed in this article, Ark isn’t a CPU-bound game, so unless you’re running tons of background applications, this command won’t do much. But it doesn’t hurt to have it on!
**-nomansky**: Removes sky details, which will make the heavens look quite bland while possibly squeezing out more FPS. In our tests, this gave us a boost of 1–2 FPS, but we’re running it on a higher-end PC. Your mileage may vary.
**-lowmemory**: Lowers a few settings to make the game run on PCs with “only” 4 GB of RAM.
**-USEALLAVAILABLECORES:**(the game will use all your CPU cores)
**List of the all useful launch options with descriptions:**
-USEALLAVAILABLECORES - (the game will use all your CPU cores)\
-sm4 and -d3d10 - (runs game with DirectX 10)\
-nomansky (removes clouds and some sky effects)\
-lowmemory (the game will use only 4gb of your RAM)\
-w 640 -h 480 - (runs game in 640x480 resolution)\
-full - (fullscreen mode)\
-window - (windowed mode with borders)\
-noborder - (windowed mode without borders)\
-low - (runs ARK as a low-priority process)\
-high - (runs ARK as a high-priority process)\
-noaafonts - (removes fonts anitalising)\
-autoconfig - (return default settings)\
-novid (turns off some cinematics)\
-console - turns on the developer console (ark doesn't use this)\
-noeac - turns off the easy anti-cheat software. (ark doesn't use this)\
-dx10 - toggles dx10 use\
-dx11 - toggles dx11 use\
-dx12 - toggles dx12 use
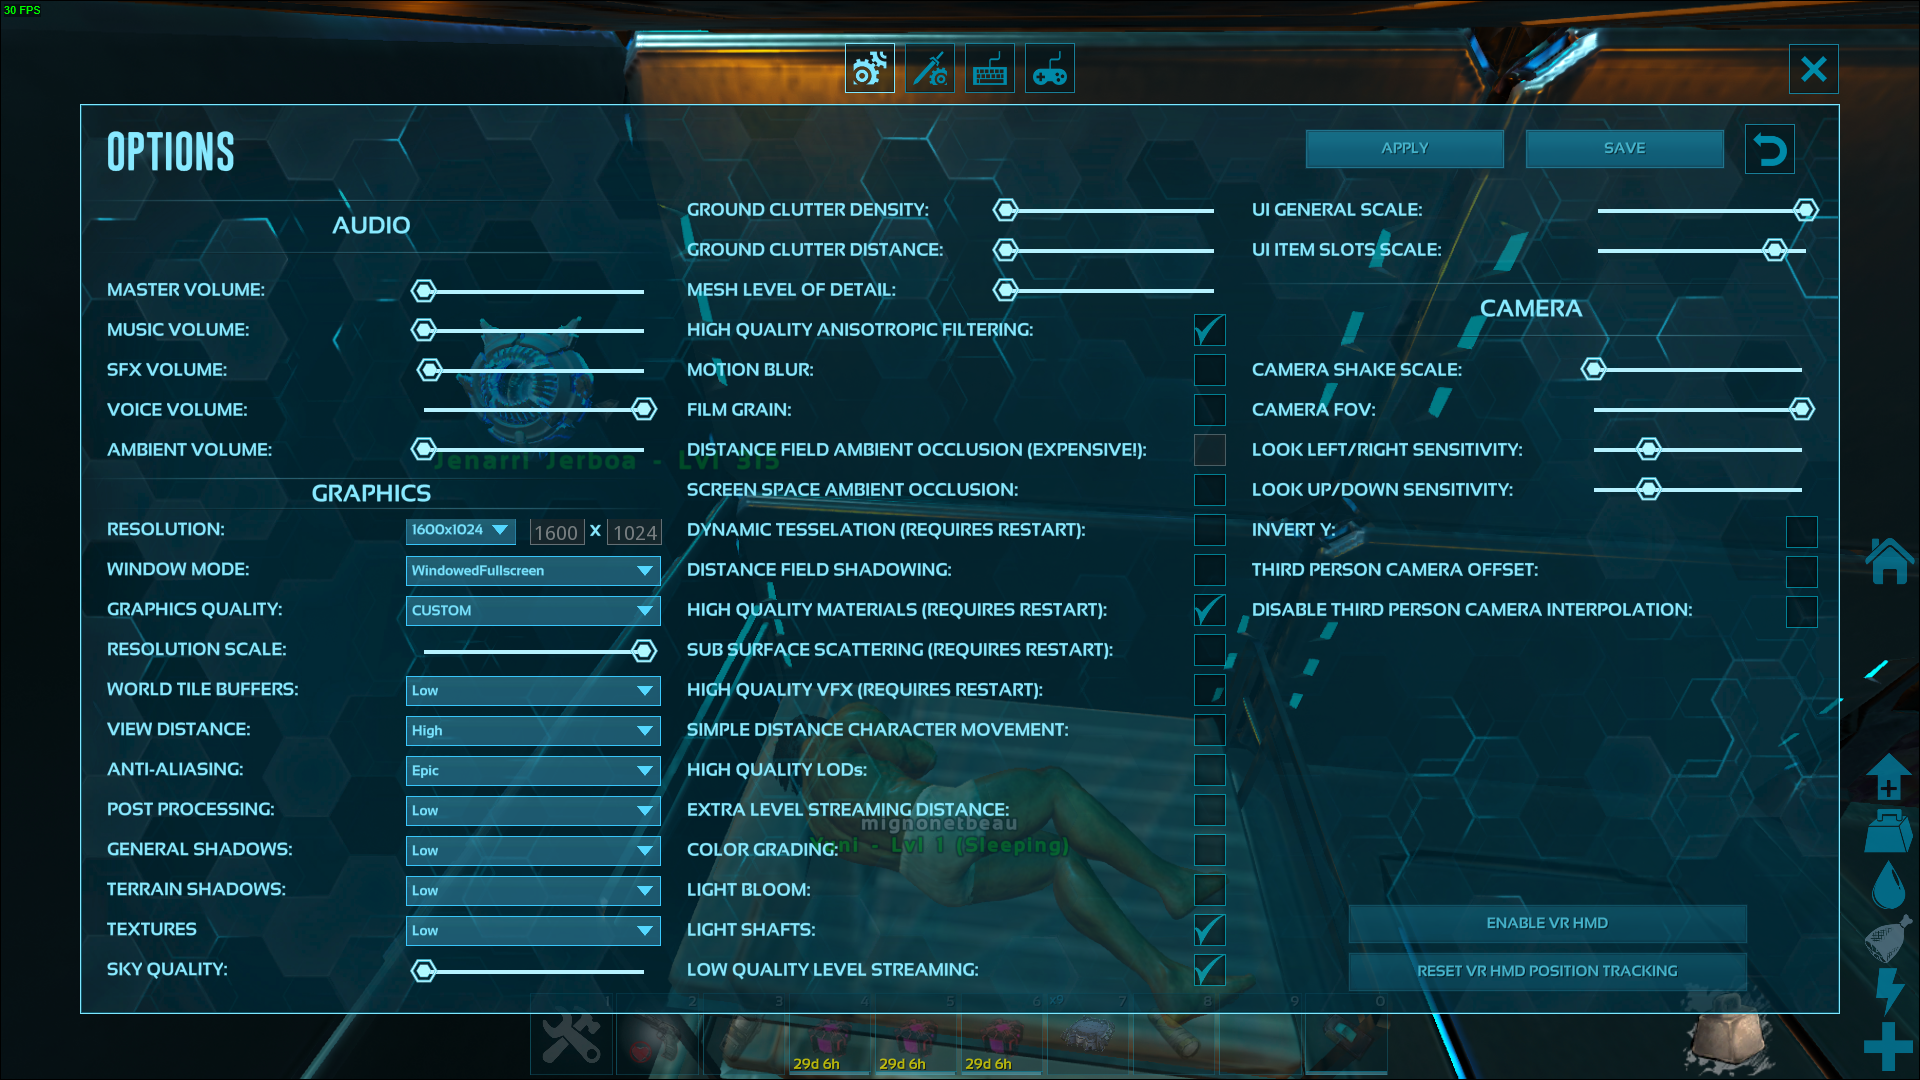
### ASE(ARK) SURVIVAL OPTIONS PANEL CONFIGURATIONS:
Click image to enlarge!
***Open the Options Screen from your ARK Lobby Screen. After altering all of these settings, remember to save them!***
**For HIGH/EPIC Settings.**
resolution scale = 100 \
World tile Buffer = EPIC \
View distance = HIGH \
Anti-aliasing = EPIC \
Post Processing = EPIC \
General Shadows = LOW \
Terrain Shadows = LOW \
Textures = EPIC
#### For MEDIUM/HIGH Settings.
resolution scale = 100\
World tile Buffer = HIGH\
View distance = MEDIUM\
Anti-aliasing = EPIC\
Post Processing = EPIC\
General Shadows = LOW\
Terrain Shadows = LOW\
Textures = HIGH
#### For LOW Settings.
resolution scale = meter all the way to left\
World tile Buffer = LOW\
View distance = LOW\
Anti-aliasing = EPIC\
Post Processing = LOW\
General Shadows = LOW\
Terrain Shadows = LOW\
Textures = LOW
We will now walk you through every option as many of them can impact FPS or boost/lower overall game performance: Please note that these options will not be the most optimal setup for all computers, but about 80% of them will see a huge increase in FPS from changing these settings.
**Resolution** – change this depending on your device and CPU/GPU, desktop computers should not have any problems running 1920×1080 but on a Laptop it’s recommended to use the 1280×768 resolution. \
**Window Mode**– ALWAYS have this in full screen, Windowed or WindowedFullscreen will decrease your FPS and cause lag and/or frame tearing. Note full window is NOT compatible with alt tabbing. \
**Resolution Scale** – lowering it down will decrease resolution but increase FPS, only lower this as a last resort if you have lag even with other settings optimized. \
**World Tile Buffers, View Distance, Anti-Aliasing and Post Processing** – set these to medium or low depending on your computer. \
**General Shadows, Terrain Shadows, Ambient Lightning** – configuring these to the lowest setting will provide you with a nice increase to FPS and overall performance. \
**Sky Quality, Ground Clutter Density, Ground Clutter Distance and Mesh Level of Detail** – set these between lowest-middle, these will most certainly lower your overall FPS if you have them on max. \
**High-Quality Anisotropic Filtering** – ON This feature creates smoother looking objects from various points of view. \
**Motion Blur** – OFF An unimportant aesthetic. \
**Film Grain** – OFF Another unimportant feature. \
**Distance Field Ambient Occlusion** – OFF Triggers soft shadows for distant objects. \
**Screen Space Ambient Occlusion** (SSAO) – OFF Triggers soft shadows for nearby objects. \
**Dynamic Tessellation** – OFF \
**Distance Field Shadowing** – OFF Another shadows-related feature. \
**High-Quality Materials** – OFF This option improves textures of in-game materials. \
**Sub Surface Scattering** – ON It affects light behavior and makes foliage more realistic. \
**High-Quality VFX** – OFF It affects all in-game water effects. \
**Simple Distance Character Movement** – ON It relieves CPU from animations of distant characters. \
**High-Quality LODs** – ON Improves the level of details. \
**Extra Level Streaming Distance** – OFF This will make map loading faster while moving fast. \
**Color Grading** – ON Slightly improves colors. It won’t affect FPS. \
**Light Bloom** – Personal Choice. Won’t affect performance. Can cause blinding bright spots.\
**Light Shafts** – Personal Choice. It doesn’t affect performance. Can cause bright Shafts of light.\
**Mesh Level of Detail (LOD)** – Again. you can choose to disable/enable it by your own preferences. It affects GPU VRAM marginally.
***Alternative INI settings for Graphic improvements in ARK:S.E.***
In order to do this, you’ll be messing around with .ini files in ARK’s installation directory. So keep that in mind, and proceed at your own risk. It’s probably a good idea to make backups of the files you’re poking around at, but also make sure you know how to verify files in Steam. That’s generally the easiest way to restore a game to its official state.
***So your first step is to navigate to the following folder, first by right-clicking ARK in your library, clicking “Manage,” then “Browse Local Files.”***
`\steamapps\common\ARK\ShooterGame\Saved\Config\WindowsNoEditor\`
There are two files we’re interested in. Those files are named `“Engine.ini” and “GameUserSettings.ini.”`
You want to open them with Notepad or a similar basic text editor in order to edit them. Now, you’ll be replacing everything written in those files with a new list of directions for ARK. Make sure all the original text has been fully replaced.
Make sure to save both of these files once you drop the new text in.
Now, your mileage may vary based on your PC’s specs of course. But most folks seem to be reporting anywhere from a 10 to 20 FPS bump after doing this.
***For Engine.ini, use this:***
\[/script/engine.renderersettings] r.DefaultFeature.Bloom=False r.DefaultFeature.AmbientOcclusion=False r.DefaultFeature.AutoExposure=False r.DefaultFeature.MotionBlur=False r.DefaultFeature.LensFlare=False r.EarlyZPass=0 r.SSAOSmartBlur=0 r.HZBOcclusion=0 r.AmbientOcclusionLevels=0 r.BloomQuality=0 r.DepthOfFieldQuality=0 r.SSR.Quality=0 r.SSS.Scale=0 r.SSS.SampleSet=0 r.DetailMode=0 r.LensFlareQuality=0 r.MaxAnisotropy=0 r.oneframethreadlag=1 r.LightShaftQuality=0 r.RefractionQuality=0 r.ExposureOffset=0.3 r.ReflectionEnvironment=0 r.Atmosphere=0 r.Shadow\.MaxResolution=2 r.SimpleDynamicLighting=1 r.UpsampleQuality=0 r.ViewDistanceScale=0.4 r.TrueSkyQuality=0
\[/script/shootergame.shooterengine] bFirstRun=False FrameRateCap=200 FrameRateMinimum=200
\[Core.System] Paths=../../../Engine/Content Paths=../../../ShooterGame/Content Paths=../../../Engine/Plugins/Experimental/CharacterAI/Content Paths=../../../Engine/Plugins/TrueSkyPlugin/Content
\[SystemSettings] TEXTUREGROUP\_World=(MinLODSize=1,MaxLODSize=2,LODBias=0,MinMagFilter=aniso,MipFilter=point) TEXTUREGROUP\_WorldNormalMap=(MinLODSize=1,MaxLODSize=2,LODBias=0,MinMagFilter=aniso,MipFilter=point) TEXTUREGROUP\_WorldSpecular=(MinLODSize=1,MaxLODSize=2,LODBias=0,MinMagFilter=aniso,MipFilter=point) TEXTUREGROUP\_Character=(MinLODSize=1,MaxLODSize=4,LODBias=0,MinMagFilter=aniso,MipFilter=point) TEXTUREGROUP\_CharacterNormalMap=(MinLODSize=1,MaxLODSize=4,LODBias=0,MinMagFilter=aniso,MipFilter=point) TEXTUREGROUP\_CharacterSpecular=(MinLODSize=1,MaxLODSize=4,LODBias=0,MinMagFilter=aniso,MipFilter=point) TEXTUREGROUP\_Weapon=(MinLODSize=1,MaxLODSize=64,LODBias=0,MinMagFilter=aniso,MipFilter=point) TEXTUREGROUP\_WeaponNormalMap=(MinLODSize=1,MaxLODSize=64,LODBias=0,MinMagFilter=aniso,MipFilter=point) TEXTUREGROUP\_WeaponSpecular=(MinLODSize=1,MaxLODSize=64,LODBias=0,MinMagFilter=aniso,MipFilter=point) TEXTUREGROUP\_Vehicle=(MinLODSize=1,MaxLODSize=256,LODBias=0,MinMagFilter=aniso,MipFilter=point) TEXTUREGROUP\_VehicleNormalMap=(MinLODSize=1,MaxLODSize=256,LODBias=0,MinMagFilter=aniso,MipFilter=point) TEXTUREGROUP\_VehicleSpecular=(MinLODSize=1,MaxLODSize=256,LODBias=0,MinMagFilter=aniso,MipFilter=point) TEXTUREGROUP\_Cinematic=(MinLODSize=1,MaxLODSize=128,LODBias=0,MinMagFilter=aniso,MipFilter=point) TEXTUREGROUP\_Effects=(MinLODSize=1,MaxLODSize=128,LODBias=0,MinMagFilter=linear,MipFilter=point) TEXTUREGROUP\_EffectsNotFiltered=(MinLODSize=1,MaxLODSize=128,LODBias=0,MinMagFilter=aniso,MipFilter=point) TEXTUREGROUP\_Skybox=(MinLODSize=1,MaxLODSize=256,LODBias=0,MinMagFilter=aniso,MipFilter=point) TEXTUREGROUP\_UI=(MinLODSize=1,MaxLODSize=256,LODBias=0,MinMagFilter=aniso,MipFilter=point) TEXTUREGROUP\_Lightmap=(MinLODSize=1,MaxLODSize=8,LODBias=0,MinMagFilter=aniso,MipFilter=point) TEXTUREGROUP\_Shadowmap=(MinLODSize=1,MaxLODSize=2,LODBias=0,MinMagFilter=aniso,MipFilter=point,NumStreamedMips=3) TEXTUREGROUP\_RenderTarget=(MinLODSize=1,MaxLODSize=128,LODBias=0,MinMagFilter=aniso,MipFilter=point) TEXTUREGROUP\_MobileFlattened=(MinLODSize=1,MaxLODSize=2,LODBias=0,MinMagFilter=aniso,MipFilter=point) TEXTUREGROUP\_Terrain\_Heightmap=(MinLODSize=1,MaxLODSize=2,LODBias=0,MinMagFilter=aniso,MipFilter=point) TEXTUREGROUP\_Terrain\_Weightmap=(MinLODSize=1,MaxLODSize=2,LODBias=0,MinMagFilter=aniso,MipFilter=point)
\[Oculus.Settings] bChromaAbCorrectionEnabled=True bYawDriftCorrectionEnabled=True bDevSettingsEnabled=False bOverrideIPD=False bOverrideStereo=False bOverrideVSync=True VSync=True bOverrideScreenPercentage=False bAllowFinishCurrentFrame=True bLowPersistenceMode=True bUpdateOnRT=False FarClippingPlane=0.000000 NearClippingPlane=0.000000
\[WindowsApplication.Accessibility] StickyKeysHotkey=False ToggleKeysHotkey=False FilterKeysHotkey=False StickyKeysConfirmation=False ToggleKeysConfirmation=False FilterKeysConfirmation=False
***And for GameUserSettings.ini use this:***
\[/script/shootergame.shootergameusersettings]
MasterAudioVolume=0.107143
MusicAudioVolume=0.039683
SFXAudioVolume=0.409387
CameraShakeScale=0.037899
bFirstPersonRiding=False
bThirdPersonPlayer=False
bShowStatusNotificationMessages=True
TrueSkyQuality=0.000000
FOVMultiplier=1.250000
GroundClutterDensity=0.000000
bFilmGrain=False
bMotionBlur=False
bUseDFAO=False
bUseSSAO=False
bShowChatBox=False
bCameraViewBob=False
bInvertLookY=False
bFloatingNames=True
bChatBubbles=True
bJoinNotifications=False
bCraftablesShowAllItems=True
LookLeftRightSensitivity=1.000000
LookUpDownSensitivity=1.000000
GraphicsQuality=4
ActiveLingeringWorldTiles=10
bUseVSync=False
ResolutionSizeX=1920
ResolutionSizeY=1080
LastUserConfirmedResolutionSizeX=1920
LastUserConfirmedResolutionSizeY=1080
WindowPosX=-1
WindowPosY=-1
bUseDesktopResolutionForFullscreen=False
FullscreenMode=0
LastConfirmedFullscreenMode=1
Version=5
bHideServerInfo=False
LastServerSearchType=2
LastServerSearchHideFull=False
LastServerSearchProtected=False
HideItemTextOverlay=False
bDistanceFieldShadowing=False
LODScalar=0.000000
HighQualityMaterials=False
HighQualitySurfaces=False
bTemperatureF=False
bDisableTorporEffect=True
\[ScalabilityGroups]
sg.ResolutionQuality=100 sg.ViewDistanceQuality=2 sg.AntiAliasingQuality=0 sg.ShadowQuality=2 sg.PostProcessQuality=2 sg.TextureQuality=2 sg.EffectsQuality=0 sg.TrueSkyQuality=0 sg.GroundClutterQuality=0 sg.IBLQuality=0 sg.HeightFieldShadowQuality=2
\[SessionSettings] SessionName=ARK #563569
\[/script/engine.gamesession] MaxPlayers=120
\[AdminPassword] Password= ServerPassword=
## GAME ERRORS and FIXES
### **What to do if your Client cannot connect to our servers!**
Client Connection Errors
**Are you able to directly connect to all the servers in a cluster?**\
Make sure you can directly connect to all the servers. It can take longer for some maps to load up than others. Make sure you are allowing 5-10 minutes for all the servers to fully load up.
**To Use Direct connect...**\
Go to your Steam page> view> servers> when the box pops up, along the top are tabs, select "History" and there will be all the servers you have joined in the last two months.\
To join a server from one of them: right click the servers line, in the box that opens select "add server IP" add the ip address (use just the number from the steam link) and hit the "join this server" button. It will take a few seconds to minutes to load up.\
\
**Double Check the filter settings in the server browser of the obelisk**\
Make sure your filters do not filter out the servers. For example, the option "Show Passworded Servers" will filter out all servers except Passworded servers.\
\
**Are all the mods updated?**\
Mods will take time to update. Not only do they need to download they also need to install. This can take several minutes for some mods. They will show white type in the bottom right hand corner of the lobby.
#### Snapshot\_ # Fatal error Load.
Windows 11 doesn't handle Ark like other programs, by automatically increasing the swap file size so it can unload more stuff to let Ark load. That's why Ark can usually join a clean server, but not one with heavy mods. And if you fail to load Ark fast enough when trying to log in, you timeout your login and generate the Snapshot\_# error.
One fix for this is, if possible, moving your ARK mods to a SSD. The SSD will then load the mods much faster and you should not time out. But as most SSD are small in size this is not always a possibility. Try following the steps outlined below, and if they do not work , Our next step would be to make a larger Virtual Memory Allotment.
Find the DefaultEngine.ini file, \
\ARK\ShooterGame\Config on the client \
Make a backup of these file(s). \
Locate the lines\
`[/Script/OnlineSubsystemUtils.IpNetDriver]` \
`InitialConnectTimeout=300.0` \
`ConnectionTimeout=300.0` \
and change "300" to "600".
Consider using the launch options mentioned in the Launch Options section and try ARK again.
Launch ARK in Low Memory 4GB mode and try again.
Launch ARK in Extremely Low Memory mode
SETTING UP YOUR LOBBY WINDOW
 **Click image to enlarge!**
Make sure all the boxes in the top row are on default settings. At the bottom left you need to check With Mods, and Survivors Also when you are Downloading a mod... WAIT till that box in the bottom right ... Marked with a RED BOX here. IS done doing the mod updates. YOU will be disconnected over and over till the mod is done Downloading and Installing.
How to Join from Steam History!
 **Click image to enlarge!**
Go to your Steam page> view> servers> when the box pops up, along the top are tabs, select "History" and there will be all the servers you have joined in the last two months.\
To join a server from one of them: right click the servers line, in the box that opens select "Join this Server?" and there you have it.
Mod Installation Problems
When mod installation freezes or slows down or the mods do not install properly or are errored and a Verify does not fix the issue.
1. Close ARK Unsubscribe from all your ARK mods at
(Feel free to favorite them to keep them in a list)
2. Delete your \steamapps\common\ARK\ShooterGame\Content\Mods folder
3. Delete your \steamapps\workshop\content\346110 folder
4. Use the launch option "Launch ARK (Reset Total Conversion) "
5. Reconnect to your server (You will be timed out while the mods are re-subscribed and re-downloaded)
6. Return to the main menu
7. Wait until all messages on bottom right of your screen go away
8. Try playing again - otherwise Try Increasing Virtual Memory on your OS. Instructions follow in the next section.
Increasing Virtual Memory on your OS.
#### Method #1 You can compress the installation folder.
Go to the ark directory, find "content" and "seekfreecontent", \
and enable NTFS file compression from the "properties" menu. \
It can take an hour or two to complete depending on your CPU speed.\
Most games come pre-compressed. \
ARK does not, because the devs are inept.
#### Method #2 Unsubscribe and clean Mod Files out.
Unsubscribe from all your mods, (while doing this "favorite" any of the mods you do want to keep or you are intrested in, so you do not loose them.)\
delete all workshop folders in this location:\
ARK>ShooterGame>Content>Mods\
Then resubscribe to the mods that you actually use now, and then exit steam and restart it. \
This should trigger the steam download to start.
#### Method #3 Using a third party application to compress files.
Use this Third party app if you are on win10: \
Visual Interface for the Windows 10 Compact Function\
\
You can cut a brand new install by 60GB with zero perceptible change by compressing the filesystem (e.g. removing duplication)
Black Screens -Dual Monitors
Sometimes your graphic card will overheat when running two monitors, while in ARK Survivor. This applies where one monitor is 144mhz and the other is 59-60mhz. Set the newer monitor to 60mhz to stop the black screen issues. Then in ARK Survivor, open your tab bar and type `t.maxfps 60`. This command limits the FPS to 60FPS which in turn keeps the graphic much more stable and much cooler. And the plus, NO MORE BLACK SCREENS.
Too Bright Screens - Map Specific in ARK: Survivor
You can also fix the weird shininess/everything is too bright bug by going into settings while in game and going to options.
Next turn reflections to low, hit apply, then turn them off and hit apply again.
Use of the Launch Parameter -sm4 will reduce brightness on some Video Cards.
Various Graphic Resets with EACH Patch.
1\. Using -SM4 into set **launch options** \
2\. Tab to open up console ingame and type `R.Shadowquality` 0. This one will turn off shadows completly and give you a huge FPS boost. \
3\. Change some INI Files in your CLIENT SIDE settings. \
You will find the files here: `\SteamApps\common\ARK\ShooterGame\Config` LOOK FOR `DefaultEngine.ini` file "make a copy of this one So you always have it somewhere."
#### Find this section below:
\[/Script/Engine.RendererSettings] \
r.MobileHDR=True \
r.AllowOcclusionQueries=True \
r.MinScreenRadiusForLights=0.030000 \
r.MinScreenRadiusForDepthPrepass=0.030000 \
r.PrecomputedVisibilityWarning=False \
r.TextureStreaming=True \
Compat.UseDXT5NormalMaps=True \
r.AllowStaticLighting=False \
r.NormalMapsForStaticLighting=False \
r.GBuffer=True \
r.GenerateMeshDistanceFields=True \
r.Shadow\.DistanceFieldPenumbraSize=0.050000 \
r.TessellationAdaptivePixelsPerTriangle=8.000000 \
r.SeparateTranslucency=True \
r.CustomDepth=0 \
r.DefaultFeature.Bloom=False \
r.DefaultFeature.AmbientOcclusion=True \
r.DefaultFeature.AutoExposure=True \
r.DefaultFeature.MotionBlur=False \
r.DefaultFeature.LensFlare=False \
r.DefaultFeature.AntiAliasing=1 \
r.EarlyZPass=2 \
r.EarlyZPassMovable=True \
r.ClearSceneMethod=1 \
r.MSAA.CompositingSampleCount=0 \
r.WireframeCullThreshold=5.000000 \
;PRIMAL - DS \
r.SSAOSmartBlur=0
**Second option:**
You can change the majority in the game settings menu but we offer you a whole settings list of edited values. You can change GameUserSettings.ini file this way:
Go to the Steam client. \
Open Library and right-click Ark: Survival Evolved. \
In the Local Files tab open Browse Local Files. \
Open Shooter game folder. \
Click Saved, then Config and finally open `WindowsNoEditor.` \
Find `GameUserSettings.ini file`. \
Open with Notepad and delete all. \
Copy and paste these values:
\[/Script/ShooterGame.ShooterGameUserSettings]\
MasterAudioVolume=0.75\
MusicAudioVolume=0.25\
SFXAudioVolume=0.25\
CameraShakeScale=0.000000\
bFirstPersonRiding=False\
bThirdPersonPlayer=True\
bShowStatusNotificationMessages=True\
TrueSkyQuality=0.000000\
FOVMultiplier=1.250000\
GroundClutterDensity=0.000000\
bFilmGrain=False\
bMotionBlur=False\
bUseDFAO=False\
bUseSSAO=True\
bShowChatBox=False\
bCameraViewBob=False\
bInvertLookY=False\
bFloatingNames=True\
bChatBubbles=true\
bJoinNotifications=True\
bCraftablesShowAllItems=True\
LookLeftRightSensitivity=1.000000\
LookUpDownSensitivity=1.000000\
GraphicsQuality=3\
ActiveLingeringWorldTiles=12\
bUseVSync=False\
ResolutionSizeX=1768\
ResolutionSizeY=992\
LastUserConfirmedResolutionSizeX=1920\
LastUserConfirmedResolutionSizeY=1080\
WindowPosX=-1\
WindowPosY=-1\
bUseDesktopResolutionForFullscreen=False\
FullscreenMode=1\
LastConfirmedFullscreenMode=1\
Version=5\
bHideServerInfo=False\
LastServerSearchType=2\
LastServerSearchHideFull=False\
LastServerSearchProtected=False\
HideItemTextOverlay=True\
bDistanceFieldShadowing=True\
LODScalar=1.000000\
HighQualityMaterials=False\
HighQualitySurfaces=False\
bTemperatureF=False\
bDisableTorporEffect=True\
VoiceAudioVolume=1.277778\
bLocalInventoryShowAllItems=False\
bRemoteInventoryShowAllItems=False\
ClientNetQuality=3\
bToggleToTalk=False\
bChatShowSteamName=True\
bChatShowTribeName=True\
EmoteKeyBind1=0\
EmoteKeyBind2=0\
bNoBloodEffects=False\
bLowQualityVFX=True\
MacroCtrl0=\
MacroCtrl1=\
MacroCtrl2=\
MacroCtrl3=\
MacroCtrl4=\
MacroCtrl5=\
MacroCtrl6=\
MacroCtrl7=\
MacroCtrl8=\
MacroCtrl9=\
bSpectatorManualFloatingNames=False
\[ScalabilityGroups]\
sg.ResolutionQuality=100\
sg.ViewDistanceQuality=3\
sg.AntiAliasingQuality=0\
sg.ShadowQuality=2\
sg.PostProcessQuality=0\
sg.TextureQuality=2\
sg.EffectsQuality=0\
sg.TrueSkyQuality=0\
sg.GroundClutterQuality=0\
sg.IBLQuality=0\
sg.HeightFieldShadowQuality=2
When you need to reset your Last played Maps
When you need to reset your Last played Maps for THE PACK CLUSTER\
Go to the Steam client. \
Open Library and right-click Ark: Survival Evolved. \
In the Local Files tab open Browse Local Files. \
Open Shooter game folder. \
Click Saved, \
then Config and finally open \
`WindowsNoEditor.` \
Find `GameUserSettings.ini file`. \
Open with Notepad \
Search for (Ctrl +F) - \[/Script/ShooterGame.ShooterGameUserSettings]\
and Copy and paste these values at the end of the \[/Script/ShooterGame.ShooterGameUserSettings] section.
\[/Script/ShooterGame.ShooterGameUserSettings] \
LastJoinedSessionPerCategory="The PACK Island PvE Cluster(3xH, 4xXP, 8xT)" LastJoinedSessionPerCategory="The PACK Center PvE Cluster(3xH, 4xXP, 8xT)" LastJoinedSessionPerCategory="The PACK Scorched Earth PvE Cluster(3xH, 4xXP, 8xT)" \
LastJoinedSessionPerCategory="The PACK Aberration PvE Cluster(3xH, 4xXP, 8xT)" LastJoinedSessionPerCategory="The PACK Ragnarok PvE Cluster(3xH, 4xXP, 8xT)" LastJoinedSessionPerCategory="The PACK Extinction PvE Cluster(3xH, 4xXP, 8xT)" LastJoinedSessionPerCategory="The PACK Valguero PvE Cluster(3xH, 4xXP, 8xT)" LastJoinedSessionPerCategory="The PACK Genesis PvE Cluster(3xH, 4xXP, 8xT)" LastJoinedSessionPerCategory="The PACK CrystalIsles PvE Cluster(3xH, 4xXP, 8xT)" LastJoinedSessionPerCategory="The PACK Genesis2 PvE Cluster(3xH, 4xXP, 8xT)" LastJoinedSessionPerCategory="The PACK Amissa PvE Cluster(3xH, 4xXP, 8xT)" LastJoinedSessionPerCategory="The PACK EbenusAstrum PvE Cluster(3xH, 4xXP, 8xT)" \
LastJoinedSessionPerCategory="The PACK Fjordur PvE Cluster(3xH, 4xXP, 8xT)" LastJoinedSessionPerCategory="The PACK Hope PvE Cluster(3xH, 4xXP, 8xT)" LastJoinedSessionPerCategory="The PACK Olympus PvE Cluster(3xH, 4xXP, 8xT)" LastJoinedSessionPerCategory="The PACK Event Map PvE Cluster(3xH, 4xXP, 8xT)"
NOW search for \[Player.Info] \
And copy and paste the following at the bottom of that section.
\[Player.Info] \
LastMapPlayed=CrystalIsles \
PlayedMaps=Genesis \
PlayedMaps=Ragnarok \
PlayedMaps=TheCenter \
PlayedMaps=Amissa \
PlayedMaps=TheIsland \
PlayedMaps=ScorchedEarth\_P \
PlayedMaps=Extinction \
PlayedMaps=EbenusAstrum \
PlayedMaps=Valguero\_P \
PlayedMaps=Olympus \
PlayedMaps=Hope \
PlayedMaps=Aberration\_P \
PlayedMaps=Arkforum\_Eventmap \
PlayedMaps=CrystalIsles \
PlayedMaps=Viking\_P \
PlayedMaps=Gen2\
\
Now SAVE and close the Wordpad File.
YOU have just added THE PACK to your Current played maps history and this will show up in the steam window on your next restart of Steam.



 Click image to enlarge!