> For the complete documentation index, see [llms.txt](https://faq.thepackgaming.com/llms.txt). Markdown versions of documentation pages are available by appending `.md` to page URLs; this page is available as [Markdown](https://faq.thepackgaming.com/soulmask/info/guide.md).
# Soulmask Tips and Tricks
## How to maintain a bonfire in Soulmask
Bonfires stay lit with fuel, and there are six different types of materials that serve as fuel: Thatch, Branches, Bark, Logs, Hardwood, and Premium Hardwood. These materials differ severely in both how abundant they are in the world around you and how long they keep a bonfire going.
Each material provides a certain amount of fuel:
* **Thatch: 28 seconds**
* **Branch: 1:54 minutes**
* **Bark: 1:54**
* **Log: 4:46**
* **Hardwood: 7:09**
* **Premium Hardwood: 7:09**
Bark, while it doesn’t provide the most fuel time, is one of the better options for fuel because unlike the other items, it isn’t used in many other recipes. Both types of Hardwood provide the most fuel time, but Hardwood is also a very important crafting material. Do not use Thatch in a bonfire; it provides almost nothing to the fuel time and it’s way more useful in other crafting recipes.
***
## The MASK
Choosing the right mask in Soulmask depends on your gameplay style and preferences. Each mask comes with unique abilities and a Mimicry mode, making them suitable for different strategies and play styles in Soulmask.
#### Starter Masks:
CIVILIZATION
CONQUEST
RICH
The Civilization mask is ideal for players who prioritize durability and survival in combat, offering benefits like increased stamina, reduced damage, and emergency healing.
For those who prefer stealth and tactical maneuvering, the Conquest mask enhances stealth abilities, boosts damage from behind, and includes a powerful life steal effect.
On the other hand, the Rich mask caters to archery enthusiasts and hunters with improved arrow precision, increased damage against creatures, and reduced stamina costs for tasks.
#### Every Mask in Soulmask and How to Find Them!
| Mask | Nodes | Bonus | How To Find & Unlock |
| ------------------------------------------------------ | ---------------------------------------------------------------------------------------------------------------------------------------------------------------------------------------- | ------------------------------------------------------------ | ---------------------------- |
| Civilization (Starter) |
Common Overclock Stamina Surge Deep Sleep Critical Barrier Outer Armor Sequence Protection Healer Mode (Mimicry) Microscopic Repair (Active)
| Stamina and Defense | Ancient Ruins - Level 25 |
| Conquest (Starter) |
Emergency Repair Living Body Mod High Mobility Immunity Activated Tissue Enhancement Power Injection Special Mode (Mimicry) Electromagnetic Barrier (Active)
| Resistance to negative status effects and harsh environments | Holy Ruins - Level 60 |
| Ironblood Guard |
| Resistance and Stamina | Ancient Dungeons - Repair it |
| Nature Enlightenment |
Nature’s Blessing
Nature’s Heal
Nature’s Protection
Eco-Balance
Nature’s Domain
Resonance Mode (Mimicry)
Nature's Heart (Active)
| Mastery over animals | Ancient Dungeons - Repair it |
| ---------------------------------------------------- | -------------------------------------------------------------------------------------------------------------------------------------------------------------------------------------------------- | -------------------- | ---------------------------- |
***
## Zone Progression
-Eastern Rainforest, typically where you spawn in and start your journey, followed by the Western and Northern Rainforest, the last two zones scale from 10-25 with level 25 Mobs and Barbarians respectively can be found in the Barracks for tribes located there.
-Mangrove is next which is across the water to the south-west of the Western Rainforest which introduces a lot more "aquatic life" and makes for pretty rough base locations, so it is not really recommended as a spot of operations, but there are some tablets to pick up here though for those adventurous enough.
-Next, we\`ll continue heading west into the three zones that all have monsters and Barbarians of varying levels from 21-30+ in the Rocky Bottomland, The Wild and finally Pit Hill. These three places make for decent locations if you are looking to build either a second base and or maybe just an outpost?
-From here we head North and into the Table Mountains where the level range is 30 - 40, however further to our west is a median zone, Lakeside Forest(26-35). And is one of the recommended locations for your second base if you are 35 and closing in on 40 as the weather is very temperamental and it gets pretty chilly, so you\`ll want to have access to the Air Heater(Awareness 40) but you WILL make due if you have level 2 Cold mod on the clothing for your tribesmen to stave of the cold. The Lakeside Forest also houses the Flint Tribe Fortress, where the levels go up to 50+, so not recommended to go in if you're low leveled here as they will turn you into a pincushion very quickly but it's an excellent place to gather good crafters and laborers later in the game.
-Just west of the Lakeside Forest is also the Jungle Cave which is a poisonous hellscape with Poison dart frogs, scorpions and other creepy crawlies but also the best place for Iron Ore.
-North of the Table Mountain is the Plateau Woodland, sharing a level range of 31-40. It holds a dungeon where you need Awareness 40 to enter, so it's worth exploring once you hit that threshold, just make sure you come WELL prepared.
-We continue our adventure north into the Giant Wood Forest and Great Prairie. Good area for a base on the Prairie as it's beautiful and full of life. But some of the enemies here are terrifying, so don’t go there unless you have the resources to make barriers around the entire base first.
-We are now going into the last of the northern regions and reaching the initial level cap of 50 in the Southern Wasteland where we are now dealing with enemies in the 41-50 bracket, sometimes even above. Don't consider this a base location unless you are ready to deal with the radiation but it's a cool locale with very varied flora and fauna. You will also find the Fang tribe has it\`s Fortress in this area, so it's definitely worth the adventure.
-Volcanic Forest 41-50, which is due southwest of the Wild, followed by the Barren Meadow 41-50+ just South of the Jungle Cave and finally the Scorching Volcano in the bottom left of the map with a whooping 46-55 level range and let me tell you. Unless you have Heat protection here, you will die in seconds the closer you get to the Volcano and you can in fact get inside the volcano as it has an expansive underground system to explore.
-The last zone is the Dark Forest, Frostleaf Grove, Frost Canyon and Alpine Land all of which are as of yet, unexplored, but perhaps someone else can offer some insight about these areas for us?
***
## Farming and Foods 🌶🌽🥕🌻
#### Where to find Crops and Seeds?
Barbarian Barracks without Mines often have crop plots. These are located in the two Barracks shown, just outside the front gates. Be sure to kill the 1st Watch Fire so no multiple npc's spawn on you. You will also find seeds from multiple boxes within the Barracks, and other items you may need or want.
The plants vary from location to location and also they can vary in what has spawned in at that current time.
**Location 1 - Northwest Barracks (Alpaca site TOO!)**\
Crops often found here: pumpkins; chilies; potatoes; cotton; corn; and tomatoes.
Barbarian Barracks: Flint Tribe North west of the Jungle.
Barbarian Barracks: Flint Tribe South west of the Salt pan in the Mangrove Swamp.
**Location 2 - South West Barracks (Salt pan here TOO!)**\
Crops often found here: papaya; guava; corn; cashew; cotton; quinoa; and cocoa.\
This is probably the earliest place that you're going to find a lot of quinoa growing that you could actually get to and obtain those items without dying early game. Rear side of the Barracks is the salt pan if you need crude salt.
#### Before The Granary
Wait! I got my first farm but it says I need a Granary?
Okay you just laid down the first farmland now it says you need a granary. Worry not you can manually plant seeds on this plot, just put the intended seed on your hot bar and start planting. You will need to manually water and fertilize as well.
**Here's Some Tips About Manual Farming**
* Watering with only a water skin is a madness just let the rain come and fill the farmland naturally.
* I recommend you get water tanks from Potting Technique to run water till water buckets are unlocked in Bronze Age-Advanced Carpentry.
* Plants won't grow without fertilizers. Depending on which plant you're growing you need the correct fertilizer. (See Fertilizer Below.)
* Focus on one farmland and just plant what you need till granary is obtained.
**Fertilizer Information**
Depending on your farm set up you'll know exactly which fertilizer you need to use most.
* Compost: Potatoes, Cotton, Aloe, Agave
* Ash: Pumpkin, Tobacco, Cocoa
* Bone Powder: Corn, Cashew, Peanut, Tomato, Papaya, Quinoa
* Stone Powder: Chili, Guava, Papaya
* Compound: All crops benefit. Boosts Crop Speed 10%
**Herbicide and Locust Pesticide**
Both of these treat two separate issues, I recommend you load these directly on your dedicated farmer tribesman, they often didn't work being put into boxes or the granary.
**Bonfire Location**
When establishing farm plots, it's crucial to note that they can only be placed within the radius of a bonfire. If necessary, consider constructing additional bonfires to expand your farming area. Additionally, the level of your bonfire directly impacts the maximum number of plots you can have, so upgrading it becomes essential for scaling up your farming operations.
**Once Granary is \[Unlocked]**
As you transition from manual farming to automation and multiple plots, it's imperative to have prioritized fertilizer production. By this stage, most players also consider upgrading from their thatch hut to establish their first early mid-game main base, signaling the imminent entry into the Bronze Age.
You should have the following items Unlocked:
* Farmland
* Fertilizer Bucket
* Well / Rain Collector (if not near water)
* The Granary.
**Assign your Farmer to Both The Granary & Fertilizer Bucket**
One remarkable aspect is that specialized tribesmen can efficiently manage both planting and fertilizer tasks, providing full automation for your farming buildings. Ensure that you load all your seeds and fertilizer materials as required, then set up automated tasks accordingly. This streamlined process maximizes efficiency and minimizes manual intervention in your farming operations.
**Farms inside Barracks & Fortresses**
These farms are incredible if you are looking to get resources for either food and even crafting by way of cotton, needed for a lot of various crafts. What is important to note here is that these farms, IF you empty them out, leave and return at a later time, the crops may actually change. The availability of what they can change into, seem to be dependent on what you find in the chests within the Barracks and or Fortress. In the Flint Tribe fortress, you may collect everything except for Cactus out of their farms.
***
### Cooking and Food Buffs
**Cooking is one of the most important proficiencies in the world of Soulmask.**
Highly recommend that you get a tribesman who's good cooking and put points towards output when selecting bonuses as they improve. In Soulmask, knowing what food to consume from early to late-game stages is essential for maximizing your character’s stats and performance. Early in the game, focus on unlocking the Cooking Stove at awareness strength 8 to expand your cooking options. Until then, use a Campfire or Bonfire. At level 18, unlock the Drying Rack, and by level 20, start brewing to enhance your recipes. Focus on making Cooking Oil by unlocking the Oil Press at level 30. Unlock the Worktop at level 30 to access late-game recipes. At this stage, prioritize foods with higher stat boosts and longer preservation.
#### **Types of buffs:**
**Staple Food, Recreational, Beverage, Vegetable/Fruit, Meat, Medical Potion and finally a Cigar.**
Alcohol and Cigar provide significant recreational buffs, especially in mid and late-game stages. You can have 7 different buffs active at any one time. **3 Meals, 2 Drinks, 1 Medical and 1 "unhealthy" one in the Cigar.**
Best Foods for your Journey in Soulmask
#### Special Foods for Leveling
Quinoa-based dishes are essential for leveling up your character efficiently:
* Quinoa Porridge: +5% critical damage and +100% body experience efficiency. Good for early-game.
* Seafood Quinoa: +10% critical damage and +200% body experience efficiency. Good for mid to late-game.
#### Best Early-Game Foods in Soulmask
* Cooked Meat
* Broth
* Roasted Corn or Roasted Potato (Staple Food)
* Roasted Pumpkin (Vegetable)
* Fruit Wine or Mezcal (Recreational)
Key Buffs:
* Food Buff: Use Broth for a cheap 100 HP boost.
* Staple Food Buff: Choose between Roasted Corn (defense boost) or Roasted Potato (carry weight boost).
* Fruits and Vegetables Buff: Opt for Roasted Pumpkin to increase stamina recovery.
#### Best Mid-game foods in Soulmask:
* Premium Jerky
* Tortilla or Cooked Potato (Staple Food)
* Pumpkin Salad (Vegetable)
* Tequila (Recreational)
Key Buffs:
* Premium Jerky: Provides 100 HP and +5 attack, with no spoil timer.
* Tortilla: Increase defense by 10.
* Cooked Potato: Max load increased by 40%.
* Pumpkin Salad: Boosts stamina recovery by 50% and max stamina by 10.
#### Best Late-Game Foods in Soulmask:
* Smoked Ham
* Fried Taco or Fried Potato Bun (Staple Food)
* Fried Pumpkin Ring (Vegetable)
* Mead (Recreational)
Key Buffs:
* Smoked Ham: Increases HP by 200% and attack by 10, with no spoil timer.
* Fried Taco: Enhances defense by 40%.
* Fried Potato Bun: Increases max load by 80.
* Fried Pumpkin Ring: Improves stamina recovery by 100% and max stamina by 20.
#### Alcohol and Cigar Buffs
**Alcohol:**
* Fruit Wine: +3% damage.
* Mezcal: +3% critical hit chance.
* Tequila: +6% critical hit chance.
* Mead: +6% damage.
**Cigar:**
* General Buff: +10% critical resist.
***
### Hunting
The hunting Gallery is VERY useful.
It will show a lot of useful info about the local wildlife and enemies you encounter so I recommend having a look if you are struggling with a specific enemy, perhaps you\`re just using the wrong weapon to fight it?
🌶🌽🥕🌻
***
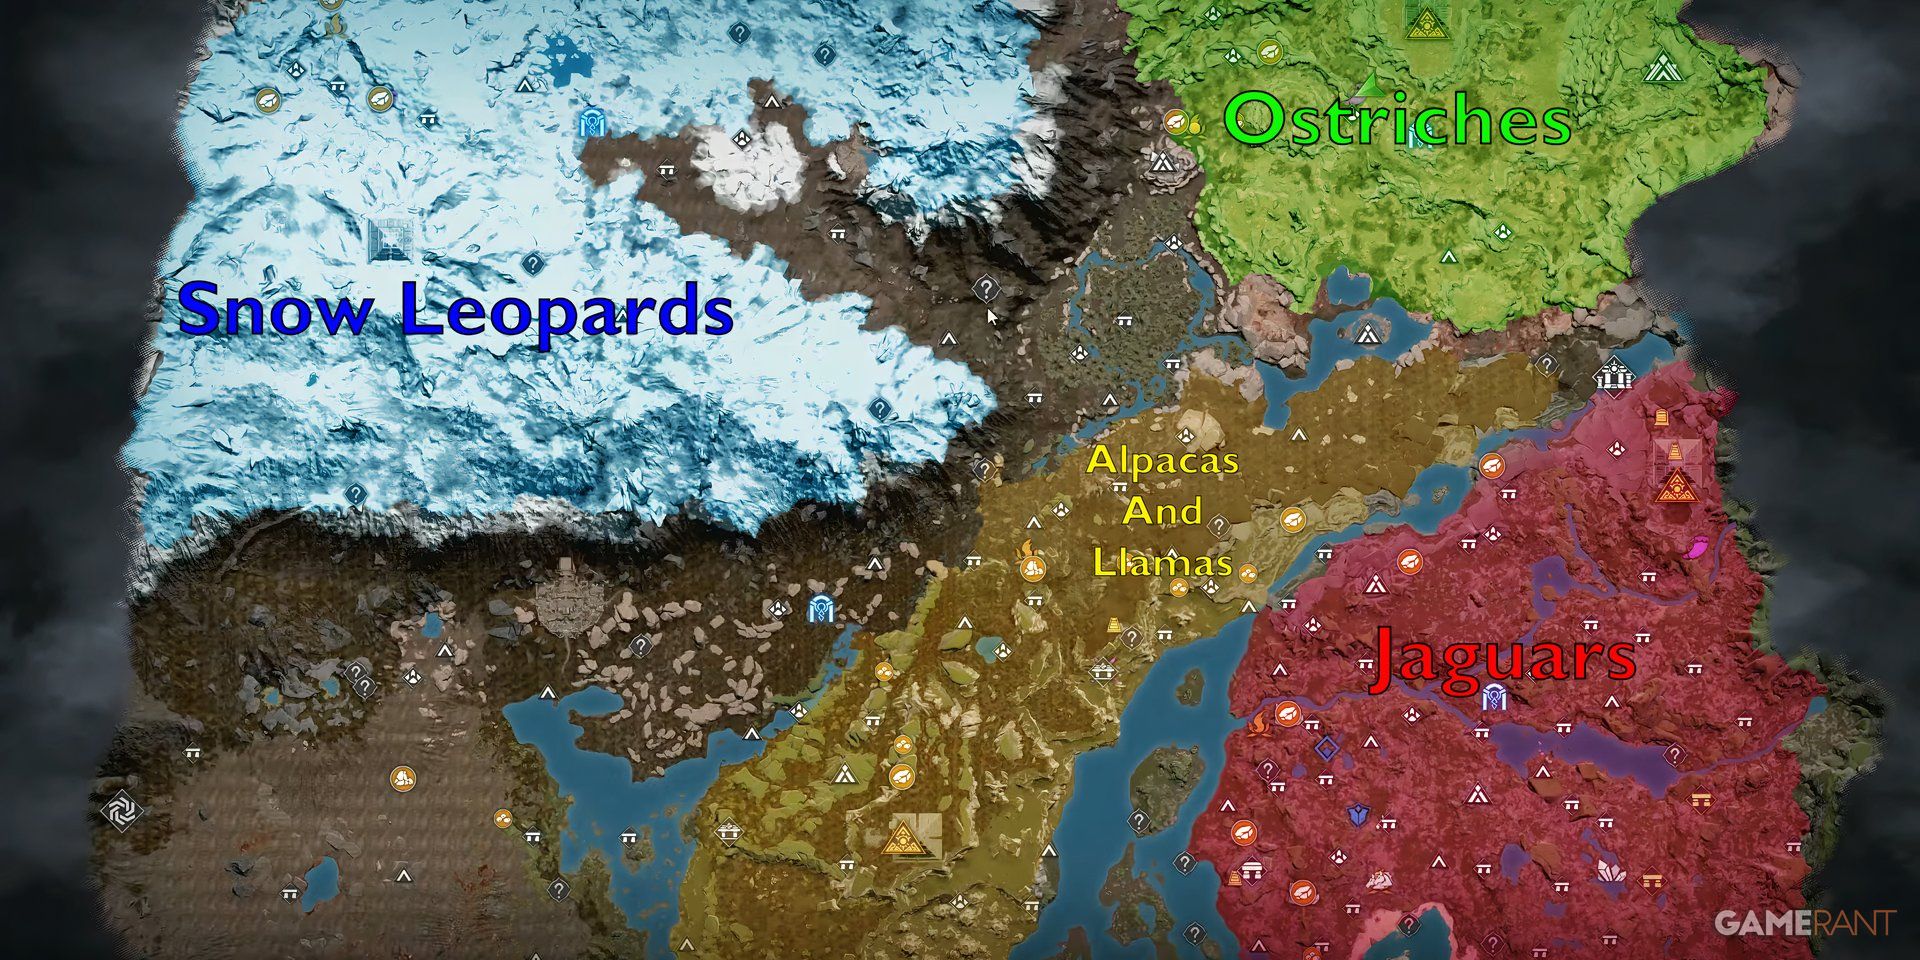
## The Mounts 🦙 🐆
### **Quick facts before we deep dive:**
* All animals have rarities ranging from lowest to highest: White, Green, Blue, Purple, Yellow, Orange/Red.
* The rarity of an animal determines both its size and its stats. Higher rarity means a larger mount with better stats.
* Saddles also have rarities, and the rarity of the saddle will further improve the stats of the animal it is equipped on.
### Alpaca Guide 🦙
Alpacas are the first early game mount you should come across, these guys are very easy to tame and take no time to catch.
Catching your First Alpaca
**What They Eat**
Thatch, Potato, Quinoa, Pumpkin, Corn, Banana, Pineapple, Peanut, Alpaca Feed, Refined Alpaca Feed
**How to Catch**
Honestly the easiest to catch you can find them at ancient ruins, and barbarian barracks. Since they're already caged up you simply need to pick them up and set them down on the ground from there, whistle them and walk back to base.
### Llama Guide 🦙
Llamas are similar to the Alpaca. They are very easy to tame and take no time to catch. They're able to carry way larger weight limits (800 vs 350) are great for resource collecting. They can also carry unconscious barbarians or small livestock.
Catching your First Llama
**What They Eat**
Quinoa, Pumpkin, Corn, Banana, Pineapple, Peanut, Llama Feed, Refined Llama Feed
**How to Catch**
What's Needed:
* 1-2 medium traps crafted
* any item they eat (1 is only needed per trap)
Where to Find
WIP
### Jaguar Guide 🐆
Jaguars are another early game mount you should come across, these guys can be difficult to catch and require a lot of patience since there is a capture event mini-game associated with the cubs.
NOTE: The Mini Game Can Fail! If the mother jaguar agro's you and you kill it before a cub spawns you will need to start over, once the cub is spawned you can kill the mother.
**What They Eat**
Fresh Meat, Fish, Premium Fish, Meat, Rare Fresh Meat
**How to Catch**
What's Needed:
* 1-2 medium traps crafted
* any meat (1 is only needed per trap)
**Early Game Locations**
Basically anywhere you find jaguars. There is a spot West of the Flint tribe Barracks that is reported consistent.
***Capture Event Mini Game***
* Scan the game environment for Jaguar tracks.
* Follow the tracks to initiate the capture event. Continuously scan and interact with each new set of tracks.
* Eventually, you'll observe an adult female jaguar hunting wild animals. Remain hidden and observe as the jaguar catches its prey.
* Listen for the jaguar to announce it's returning home to feed the cub. Follow the jaguar slowly, staying crouched to avoid aggro.
* When the jaguar reaches its den, it will spawn a cub and the female will display "resting" text. This is your opportunity to eliminate the female jaguar.
* Place traps strategically and load them with food.
* Be patient and wait for the cautious jaguar cub to approach the traps. Use Q (or the appropriate command) repeatedly to monitor and ensure they walk into the trap successfully.
* Finally pick up your Jaguar and check its stats.
Note: for black jaguars they need to be Orange Quality
### Other Mounts
Ostrich, Snow Leopard (Guides Coming Soon)
***
## Capturing Animals 🦃 🐻 🐒 🦜
### Capturing Capybara 🐻
Your Early Meat supply! Capybara are found around the ponds and rivers of the jungle. You need to sneak up and find a Mother with a cub with her. Place a medium trap nearby, bait it with pumpkins, and wait out of sight. Use perception to check if the cub has entered the trap. Alternatively if you want to keep the adults from eating your bait. Kill them off but leave the cubs. You will need the Capybara pen for your new tame. Breeding is handled after you find a male and female, The Pen can be used as a location for a tribesman to automate.
### Capturing Turkeys 🦃
These are meat and feathers for arrows. Use a small trap and find a family of turkey. Place the trap down ahead of the family and walk behind them to herd them towards the trap. The small turkey should get ensnared. You can also use ground corn to bait the trap. You will need the Turkey pen for your new tame. Breeding is handled after you find a male and female, The Pen can be used as a location for a tribesman to automate.
### Optional: Capturing Monkeys 🐒
Monkeys are super versatile; they can basically collect crops, and niche items you may need for your crafting when you assign it by holding \[e] when highlighting them with your cursor. You can find monkeys at wild storage nests throughout the jungle and will need small traps to catch them, after some testing the bait can be any fruit or nuts and they're extremely easy to catch. Crafting a Monkey storage nest and placing it will allow the tames to bring back their finds.
### Optional: Capturing Parrots 🦜
Parrots are an early warning system for raids on your base. They also provide feathers for crafting. They are throughout the jungle area. Look for an area they like to be on the ground at. You will need small traps to catch them, and ground corn for bait. These guys are very alert and you will need to crouch and sneak to set the trap. Stay hidden and do not alert the bird and eventually it will go inside to eat the bait. Bring your prized Parrot home and place it on your Parrot stand and feed and water it.
***
## Wild Tribesman
### There are 5 Tribes: Claw, Flint, Fang, Outcasts and Plunderers.
* -Everyone can be deterred except Plunderers and Elites (The ones with a unique name and a silver border around their health bar).
* -The Claw tribe is considered to have the best fighters
* -The Fang tribe specializes in Poisons and Healing/Remedies, which means they will also do well as Archers due to it being the only weapon that can utilize poisons.
* -The Flint tribe is all about developing and furthering their own tribe and are considered to make great crafters and overall workers. They also make for great warriors but with a focus on defense.
* -The outcasts don\`t belong to any tribes and their stats as such are completely random. You can find great ones of course but expect a lower chance of finding what you need, compared to if you were chasing the more specialized tribes.
### Deterrence
Deterring is the main way to recruit or gain tribesmen for your tribe. Outcasts, Barbarians and regular enemy tribesmen can be recruited with deter. When an Outcast, Barbarian, or enemy tribesman is low on health (<20% by default), a mask wearer can use their interact (default "E" key) to Deter them. The deterred NPC will fall unconscious and start slowly gaining recognition. When a minimal recognition (default 500) is reached they can be recruited. While unconscious, deterred NPC's can be healed by placing a bandage or other healing item in their inventory and clicking the use function(double clicking the item usually works). They can also be fed liquid foods such as broth in the same way. Feeding them while they are unconscious may be necessary to keep them alive. Deterred NPC's, that are still unconscious, can be picked up and carried over the shoulder or on a llama extended seat. Note: Scouts can not be deterred and recruited. The interact function interrogates them and reveals map information, instead. Scouts remain alive and hostile after the interrogation. Plunders and Tribe leaders also can not be deterred.
Players may recruit a number of Tribesmen based on their Mask upgrades. The initial Control node allows 3 Tribesmen, and fully upgrading Connection Enhancement raises the cap to 18.
### Control
After repairing the Control node on your Mask, you may take direct control of a Tribesmen by putting the mask on them. Your player character will fall asleep while you control the Tribesman. Actions taken while controlling a Tribesman use the Tribesman's skills and proficiency. EXP gained while controlling a Tribesman goes to the Tribesman's Body, Weapon, and Crafting levels. Awareness EXP earned while controlling a Tribesman goes to the chieftain controlling the tribesman.
### Profession
The Tribesmen's profession directly affects the proficiency level cap, for example: the Warrior's profession only has a probability of reaching the proficiency level cap of 120 for the five weapons: Sword, Dual-Blade, Hammer, Great sword, and Gauntlets. This probability is randomized within the interval, not calculated by probability.
The initial proficiency level of a barbarian is affected by three factors: Tribesmen level, Tribesmen profession, and Tribesmen status. For example, a Tribesmen of level 40 or above, with a high status in the smith profession, will be able to reach an initial level of 55-65 in crafting proficiency, whereas the initial level of other Proficiencies will be lower.
#### How to determine if a Barbarian is worth deterring before engaging.
* Press "Y" to open up your Mase nodes tree. Once your Core Functional Module has been activated, continue going right till you reach Perception Enhancement and then the linked node called Quality Assessment. With this node repaired, you\`ll be able to view more detailed information about both the Wildlife and the Barbarians, their titles and their potential are among some of the things you can see.
* This should help you find your preferred Barbarians to deter, but keep in mind that nothing is final as there is still a lot of RNG involved and getting the perfect barbarian is still something that we\`ll be chasing for a long time, but best of luck to you all.
THE MOST IMPORTANT thing to look for when selecting tribesmen to deter seems to be the title they hold (indicative of the types of proficiencies they're good in), and the rank (for how high their cap in those potentially goes). Highest rank I've seen so far is Master.
* Laborers are great at the collection of materials: Logging, Mining, Harvesting
* Craftsmen: Any crafting, completely random which ones they are given. Also supposed to unlock various tribes' medium/advanced clothing and costumes if they are found in a fortress(Only 3 fortresses at the minute.) Potentially bugged right now though as I\`ve deterred 50+ Craftsmen of varying levels from Novice to Master Craftsmen in a Flint fortress with 0 unlocks as of yet).
* Porters: Good at working the Kiln and or Furnace but they are also Great at transporting large quantities of items over longer distances as their weight limits are different and they have positive traits that affect how having more weight makes them move faster etc. (Unlocks the first tribe clothing too. Level 20-25 area barracks)
It is very important to note that there are currently a lot of unknowns when it comes to the positive and negative traits spread amongst all three tribes and there is NOT a definitive answer here. As a lot of you may have experienced, you can find an Outcast on the starter beach that has a perfect spread of 120 proficiencies that you may be looking for, but as they are not tied to any tribes, they thus won\`t get any of the tribe exclusive traits.
### Rarities
White < Green < Blue < Purple < Yellow(Gold) < Red\
Those are for potential (i.e. the chances for that character to have good talents and growth). THEY ARE NOT INDICATIVE OF GOOD PROFICIENCIES AT ALL.
### Proficiencies
Proficiencies go from 1-125+ in each respective school and what they have is based on a lot of factors as well as the low chance of them being a uniquely titled barbarian that can give them various perks outside of the proficiencies themselves.
The level of the deterred barbarian ONLY affects what the overall proficiencies start at when you deter them and the higher the level the better the proficiency, the level also affects their attributes.
You can totally have a white dude with one or more 120+ proficiency in something.
### Talents
Tribesmen come with certain innate Talents, and gain more as they level up. All Talents are grouped into Innate, Title, Likes, Experience, Tribe, Advantage Talents, Defect. Further, each Talent is graded into three levels: I, II, and III. Advantage talents are related to the Tribesmen Profession, and Defects will not be Profession-related (to avoid Advantages and Defects conflicting).
Each Tribesman will start with 0-3 random Likes and 0-5 random Defects. Every 10 levels, Tribesmen will gain a new Advantage Talent. Every 5 levels, they have a probability to remove a Defect.
Barbarians have a chance to unlearn negative talents every five levels and are guaranteed to get positive perks every 10. Essentially, you want to recruit tribe members with many positive talents and a few negative ones at their lowest level to increase their chances of developing more valuable characteristics.
There are 29 distinct Tribe talents and 1 Experience talent. There are 12 Innate talents (6 Advantages and 6 Defects). There are 22 Titles (19 Advantages and 3 Defects).
Link to wiki list of talents: [Tribe Talents](https://soulmask.fandom.com/wiki/Tribesmen?veaction=edit\§ion=5) Use ctrl+f and “search” the wiki page for the talent you are researching.
#### Why are Talents Important
Soulmask Talents play a significant role in determining the strength of your tribe. Stacking on tribespeople with many positive traits can make your experience much more accessible. In addition, if you want to change your current playable character, being able to hop on to a different tribe mate with lots of positive aspects can open new opportunities for you.
***
## Mysterious Tisane
Mysterious Tisane, dropped by bosses will reset the attributes of your main aka the Vagrant Novice character, but the Mysterious body shaping pill will reset the attributes of any of your deterred tribesmen.
NOTE:-there is a server setting that changes this, letting you reset the attributes of your deterred tribesmen much earlier in the game, effectively making the Mysterious body shaping pill a completely irrelevant addition to the game, so the choice is yours. Make the game easier earlier and or play it the way it's "meant" to be played.
***
## Invasion
**Fever Buildup**
Fever Bar
This gradual increase in Fever indicates that hostile forces are becoming increasingly aware of your presence and activities. Activities around Bonfires, such as working at outposts like the Logging Yard, Collection Yard, and Excavation Pit, contribute to Fever buildup. Once the Fever bar reaches its peak, it triggers an invasion event. During this event, hostile Barbarians and possibly other enemy factions will attempt to attack the Bonfire area. They aim to capture any Tribesmen working nearby and disrupt your operations. The intensity and frequency of invasions can vary based on the Fever level and player activities.
#### Managing Invasions
**Defense Preparation**
Players are advised to build various defenses around their bases to protect against these invasions. This includes:
* Traps: Ground spikes, Sticky Traps, Iron Peg Boards, Combustion Can Traps, Explosive Can Traps, and Arrow Traps. These traps can delay or damage invading forces, providing crucial time for your Tribesmen to respond.
* Barriers: Wooden Barriers, Stone Barriers, Wooden Anti-Climb Thorns, Metal Anti-Climb Thorns, Roadblocks (Bronze, Iron, and Steel). These barriers slow down or redirect enemy movements, enhancing the effectiveness of other defenses.
* Artillery: Crossbow Towers and Siege Ballista. These powerful defensive structures can inflict significant damage on invading forces from a distance.
**Patrol Route**
Effective management involves not only physical defenses but also strategic planning:
* Patrol Route Checkpoints: Place these checkpoints to establish defense routes for armed Tribesmen. These routes ensure that your forces are patrolling critical areas around the Bonfire, ready to respond to invasions.
* Equipping Tribesmen: Ensure that Tribesmen are well-equipped with weapons and armor to effectively combat invading forces. Training and managing their skills can significantly impact their performance during invasions.
* Resource Allocation: Maintain a steady supply of resources for repairs and upgrades to your defenses. Regularly check and reinforce weak points in your defenses to prevent breaches.
**Statue of God**\
The "Statue of God", in Soulmask, is a special building item that serves multiple purposes within the game, *one being an inclusion to the Invasion Mechanics.* It is more than just a decorative piece; it has functional benefits that can aid players significantly. **Notably, non combatant tribesmen will retreat to any nearby Statue of God - place them in well defended areas to keep the enemy from capturing them.**
***
### Portals
The Basic Portal that you can craft yourself will not let you teleport to unlocked teleporters, only to other basic teleporters. It is important to note that you can only teleport with whatever is currently on your action/hotbar and it will not bring anything in your inventory when using this discount portal they have provided us with unless you turn on Custom Supply Portal in the right-hand Menu in the server settings.
***
## Armor & Weapon crafting
For tribesmen traits, select Durability for 30-60 respectively and then Quality once you hit Iron as this is the point where leveling starts to slow down.\
You will unlock the Sabre tooth Armor at Awareness 40 once you kill the Berserk Sabre-toothed Predator which is a recommendation to everyone. Then when crafting the Saber tooth gear it will inherit the stats of the Iron Armor that goes into it. Hence you want to make sure it's as good as possible as this will be the best Armor you will have access to for quite a while.
Modifications make a huge difference
* All these mods you keep looting in chests from barracks and dungeons are not useless, even if the numbers may seem small they make a massive difference so use them.
* Having multiple Armor sets with different mods on them will be a benefit, even though it is grindy. Having one with Heat, Cold, Poison and Radiation protection will be the difference between surviving or dyeing.
* Repairing a Weapon or Armor WILL remove the MOD that is on them, so keep this in mind. Repair first, then put on the mod of choice.
IMPORTANT: You can in fact have EVERY single mod that fits in each respective category on a single piece of Armor, this includes but is not limited to every resistance for example: Poison proof, chill proof, heat proof and so on.
### **Unlocking Tribe Costumes and Armor**
* -The first three sets can be unlocked by Deterring the Porters in each respective low-level barrack.
* -The higher tiered ones can be acquired by deterring craftsmen from different Fortresses, supposedly. (Not proven yet.)
\~credits:\
AronAztek of Youtube.;\
[KokoHekumatiaru](https://www.reddit.com/user/KokoHekumatiaru/) of Reddit;\
Soulmask Wiki
This link is a play list of several Soulmask "HOW TOOS" from GosuNoob
<>